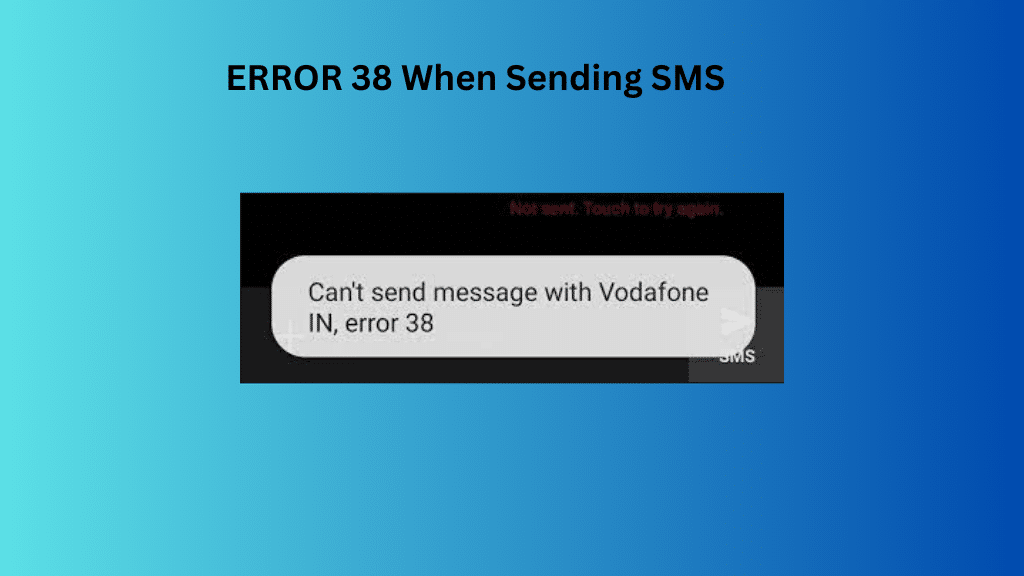
When your network operator is unable to deliver SMS, Issue 38 is an error that only Vodafone network carriers might experience. Error 38: Unable to send SMS is the error code.
Error 38 can occur for several reasons, according to the knowledge we’ve received from public forums, including There is a lack of or a poor grasp of network provider rules in the particular region from where the SMS was sent.
The issue has arisen as a consequence of a dispute between the network provider settings and the preset system parameters.
All of the SIM card specifications seem to be problematic.
What is Solutions for Error 38 when sending SMS?
Four solutions to Error 38 while sending an SMS on a Vodafone sim are mentioned below:
First option: restart your gadget
Turning your attention away from your computer and toward your phone might seem like a straightforward tech support fix, but it usually works. It’s conceivable that rebooting the phone will be all that is necessary to permanently fix the issue.
Before the boot screen shows, you must press and hold the Power button on your phone for many seconds.
Wait patiently after selecting the Restart or Reboot button, depending on the maker of your mobile device.
Solution #2: Pick the Vodafone network by hand
You have a variety of choices available to you in the Preferences menu to address the poor connectivity issue, and it could be able to help you with Vodafone error 38. The problem may be solved fairly instantly if the system operator can be chosen manually.
Access your device’s Settings menu by navigating there.
Find the SIM & Network or Connections tab by going to Preferences > Exploring.
Choose the Vodafone SIM to modify the system style if your phone only has two slots for SIM cards.
Start by finding and clicking on the Network operators tab in the list.
Tap the toggle switch next to “Pick automatically” to turn it off.
Setting the SMSC manually is Option 3.
Despite the fact that the network provider often completes this process, you might need to manually input the SMSC (SMS service center number). To get the proper SMSC number sent to your area, get in touch with the network provider by this link.
The dialer or phone app on your mobile device should now be accessible.
the code “*#4636#*” into the knob by tapping on it.
Go to a separate screen and start Phone details. Scroll down until SMSC appears in the list. Select OK.
Press the Refresh button to display the current value.
Enter the SMSC amount that you acquired from the system operator here, and then hit
Reset network settings is Option #4
The only thing left to do is to reset the system settings to their default levels if you have exhausted all other repair options and none of them have worked. You can remove any previously saved Wi-Fi, Bluetooth, and mobile network configurations with this option. Perform a community reset on the phone if there was nothing else you could do to fix the Vodafone problem 38.
Access the Settings section of your phone.
Find the Backup & Combine option by scrolling down.
Open the Network configurations reset tab by finding it and clicking on it.
After clicking the Reset Settings option, you need to wait for the process to finish.
Restart your Android smartphone to bring everything back to life and restart when the system settings for your device have been removed.
How can error code 17 be fixed?
You can see Error Code 17 when attempting to SMS someone on your phone. The problem is believed to emerge when a user sends a message a few minutes after the message is marked as “Sending.” Users encounter an error
The desired message appears to have been sent when you disconnect from a WiFi network, with the accuracy ranging from network to network. However, it appears that this is simply a short-term solution.
You need to unlock your phone and disable your WiFi connection in order to resolve problem code 17. You may do this by turning off the WiFi toggle in Quick Settings.
Wi-Fi may also be turned off by flicking the toggle next to it in the Settings app.
If the issue has received several reports, your device’s maker should provide an update with a permanent solution. You may easily solve the issue by updating your device to the most recent software version as soon as a patch is made available.
Other Methods To Fix “SMS Not Sending” Error Code 17
On Android Verify that the messaging app you’re using has the most recent version installed as the initial step in fixing a failed Android message send.
A messaging app should be your main texting program.
Simply take out and re-insert the SIM card to ensure that it is installed correctly.
If you have Fi, utilize the Project Fi app.
You must also confirm that SMS is supported by your phone’s carrier in order to resolve the message-sending issue.
Your phone can display an error code if there is no signal. Before attempting again, verify the reception on your phone.
As a precaution, you should also check the balance on your mobile phone to determine whether your plan has run out of time.
If this problem only happens with a certain set of contacts, try sending a text message once more.
When a user accidentally bans a contact and tries to message them again, they see an error notice. Check to see whether the contact or phone has been blocked by either you or them.
Before sending the text message, double-check the phone number you’re using.
How to Fix Android SMS Sending Errors?
Numerous factors might prevent Android’s SMS messages from being sent (or received, but this article will focus on the failure to send). For additional details, please see Phone Not Receiving Texts.
Solution 1: Using the Phone’s Hidden Menu to Set SMSC
Dial *#4636# from your phone’s dialer.
There will be a menu. A drop-down menu will appear.
Once you’ve reached SMSC, click the “Refresh” button. This should try to automatically set your SMSC number appropriately.
You can try manually adjusting it if it fails (refresh error).
In the SMSC box, enter your carrier’s SMSC number.
Click “Update” once you’ve typed in the SMSC number.
You may seek a list of international SMSC numbers for the most well-liked carriers by country if you’re unsure of what SMSC your carrier employs. To find the exact SMSC number, it is essential to call your carrier as these listings might not be up to date.
If you manually add the SMSC but get an “Update error,” many people advise changing the SMSC number to PDU format. The process for converting an SMSC number to PDU format is outlined below:
Visit the webpage for the Online PDU Encoder and Decoder.
There is a box for SMSC conversion at the bottom of the page, which you should scroll to.
The “Receiver” and “Message Box” fields above the “Convert” button should be empty of any text.
In the SMSC area, enter your SMSC number, and then click the Convert button.
The right side box will create a string of characters and numbers. The second line’s first 16 digits must match (highlighted in our screenshot).
Setting SMSC in the default messaging app is Option 2.
People frequently prefer a different texting app from the one that comes pre-installed on their handsets to the one that comes with their devices. Textra, Chomp, EvolveSMS, and even Facebook Messenger’s SMS functionality seem fancier than the standard app.
The default SMS app is frequently disabled by root users to prevent their phones from being bloated. For some reason, the default program often allows you to specify the SMSC number, but the majority of third-party SMS applications don’t.
This is normal since only the built-in SMS app has access to the SMSC, not third-party apps.
If any of the following apply to your circumstance, attempt the following steps:
SMSC settings in the installed SMS application.
Locate your stock SMS app by going to Settings > Apps (the one that came pre-installed on your phone).
Tap it to make sure it isn’t deactivated. If so, switch it on.
Open the SMS app now, and then seek the SMSC menu item. On my handset, I discovered it via Settings > SMS settings > SMS service center.
After entering your SMSC and saving it, try sending a text message.
If it is delivered, the issue is resolved! Return to your chosen SMS app at this time, but keep the default SMS app running. The default SMS app’s settings may really be used by third-party applications.
Resetting the SMSC on a Different Phone, Option 3
If everything else fails, some claim that by first configuring the SMSC in a separate phone and then replacing the SIM card in the problematic phone, the issue can be resolved.
Your device’s SIM card should be taken out and put into another phone. Even a dated Nokia should work.
Find the SMS / SMSC settings on the other phone, then set them. It’s critical to keep in mind that SMSC settings are kept on the SIM card, not the phone. As a consequence, the proper SMSC setup will be kept when you return to your standard phone.
How to Fix the Android “Error 98 SMS Termination Denied” Error?
Android is one of the most widely used mobile operating systems with one billion users. It is a well-liked alternative because of the customization choices and quick speeds. Most people have a cell phone with SMS capabilities, allowing them to text their friends and loved ones. Android users have recently been plagued by the error “Error 97:SMS Origination Denied.”
The following are a few factors that might result in Error 97:
When sending an SMS, SMS Origination Denied is displayed:
Faulty Data: In certain circumstances, the messaging app’s corrupt data may have been the root of the issue. Corrupt data may prevent messages from being sent and received.
Corrupt Cache: The messaging program keeps some launch parameters and other data in a cache to speed up loading and improve user experience.
First Step: Clear Cache
The messages may not be delivered if the cached data in the messaging application is corrupted. Therefore, in this phase, we will merely clean the cache and leave all of the messages in place. The steps are as follows:
Click the “settings” button on the notification panel after dragging it down.
Go down the page and select “Applications.”
choosing “Applications” as the menu choice
The “Messages” app may then be chosen from the list of apps by clicking on “Apps.”
If you can’t see the messaging app, choose “Show System Apps” from the three dots in the upper right corner.
Under “Storage,” choose the “Clear Cache” option.
“Clear Cache” click
Option 2: Data purging
In this step, we will clear the data for the Messages app’s cache if it does not cure the issue. In case they are unintentionally erased, make sure that crucial communications are backed up. On certain phones, clearing the data for the Messages app does not remove messages, while it does on other phones. To do this, repeat the previous method’s steps, but this time choose “Clear Data” rather than “Clear Cache.”
Related Articles:
Why Were Your Timezone Definitions Updated?