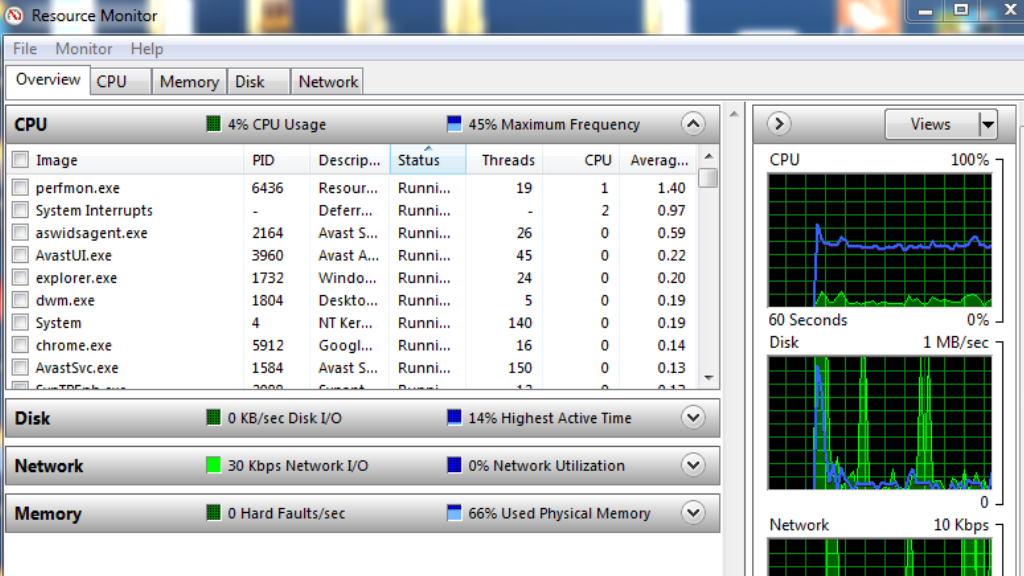
You’ve probably seen the word ‘Maximum Frequency’ in the Resource Monitor if you’re using Windows Vista.
What is the actual location of this? You’ll see a graph (and a status box) immediately next to the ‘CPU Usage’ figures in the Windows Resource Monitor’s CPU tab, titled ‘Maximum Frequency’?
What does ‘Maximum Frequency’ in Resource Monitor mean?
Maximum Frequency refers to the maximum speed at which your processor may run.
The Maximum Frequency of the Response Monitor for Windows Vista is always 100 percent if speed step, power saving, and other functions that impact the processor’s usual speed are disabled.
In other words, Processor Performance percent of the Maximum Frequency counter in Performance Monitor is equivalent to Maximum Frequency.
Here’s an illustration: If your 2.5 GHz processor runs at 800 MHz, your Maximum Frequency is 31 percent, according to the formula above. This indicates that the processor is operating at 31% of its maximum frequency of 2.5 GHz.
When you do certain tasks on your system, the Maximum Frequency of the Response Monitor now fluctuates. If Power Saver is enabled, for example, the CPU will be underclocked compared to the stock speed. The Maximum Frequency will indicate a lesser percentage in this situation.
Similarly, if turbo boost is enabled on your system, your Maximum Frequency in Response Monitor will show a greater percentage.
What is the relationship between Maximum Frequency and the processor’s clock speed?
When you first look at it, you’ll notice that Maximum Frequency is only weakly tied to the CPU’s operating frequency. Now, if Maximum Frequency is tied to the frequency at which the CPU runs, this may suggest that Maximum Frequency denotes the “percentage of the CPU’s maximum possible frequency.”
When you put your Windows system in Power Saving Mode, the Maximum Frequency figure drops to roughly 60%, but changing it to High Performance raises it to around 110 percent.
In Windows 10, how do I enable the Maximum Processor Frequency option?
We’ll go over how to add Maximum Processor Frequency in Windows 10 in the sections below:
The first method is to use the Command Prompt.
Enter “cmd” by pressing Windows Key + R, then Ctrl + Shift + Enter. Now, open a new elevated
Command Prompt and grant it administrative access by clicking Yes in the UAC (User Account Control) Prompt.
In the new Command Prompt, type “powercfg -attributes SUB PROCESSOR
75b0ae3f-bce0-45a7-8c89-c9611c25e100 -ATTRIB HIDE” and press Enter.
Your computer must now be restarted.
Press Windows Key + R to bring up the Run dialogue box. In the empty box, type “powercfg.cpl” and hit Enter.
Change Advanced power settings can be found in the Power Option menu.
Scroll down to Maximum Processor Frequency and make changes there.
Once you’ve successfully changed the values, restart your computer.
Method 2: Editing the Registry
To open the Registry Editor, hit Windows Key + Run, type “regedit” in the empty box, then press
Enter. When prompted by the UAC, grant administrative rights (User Account Control).
Paste “HKEY LOCAL
MACHINESYSTEMCurrentControlSetControlPowerPowerSettings54533251-82be-4824-96c1-47b60b740d0075b0ae3f-bce0-45a7-8c89-c9611c25e100″ into the navigation bar.
On your right-hand plane, double-click Attributes. To activate the Maximum Processor Frequency menu, change the values under Attributes to 2.
On Windows 10, how do you modify the Maximum Processor Frequency?
So far, you’ve learned how to increase the Maximum Processor Frequency in Windows 10. In this section, we’ll look at how to change the Maximum Processor Frequency in Windows 10.
The first method is to use the Power Options menu.
Check to see if the Maximum Processor Frequency menu has been enabled. If you haven’t already done so, use any of the ways listed above to activate.
Press Windows Key + R to open the Run dialogue box, then type “powercfg.cpl” and press Enter. Change plan settings in the Power Option menu, then Change Advanced Power options in the Plan Settings menu.
Simply scroll down and select Processor Power Management from the drop-down menu.
Select the + icon next to the Maximum Processor Frequency from the Processor Power Management drop-down menu.
Change the On Battery and Plugged in numbers to match the CPU’s capabilities, then click Apply to save the changes.
Your computer should be restarted.
The second method is to use the Command Prompt.
Ctrl + Shift + Enter after pressing Windows key + R and typing “cmd.””powercfg -setdcvalueindex SCHEME CURRENT 54533251-82be-4824-96c1-47b60b740d00 75b0ae3f-bce0-45a7-8c89-c9611c25e100 75b0ae3f-bce0-45a7-8c89-c9611c25e100
75b0ae3f-bce0-45a7-8c89-c9611c25e100 To change the default values of Maximum Processor Frequency, use the “MHz>” command in the elevated command prompt (On Battery). P.S. Don’t forget to substitute MHz> with the custom frequency you wish to use in the command.
For the plugged in values, type “powercfg -setacvalueindex SCHEME CURRENT 54533251-82be-4824-96c1-47b60b740d00 75b0ae3f-bce0-45a7-8c89-c9611c25e100 MHz>” As you did in step 2, replace MHz> with the custom frequency.
Once the values have been adjusted, restart your computer.
What does “disc queue length” in Windows 7’s Resource Monitor actually mean?
If a queue of pending operations exists on a disc, the disc queue length indicates the length of the queue in terms of I/O operations.
The disc queue length in the Response Monitor is simply the amount of requests that have accumulated while waiting for the disc drive to respond.
For example, if your disc can only handle one job per second but receives seven other requests,
In the resource monitor, what is the Modified and Standby Ram region?
In real-time, the Resource Monitor tool displays information about the use of both hardware and software resources. It may be easily started by typing “resmon.exe” at the command prompt.
Modified, as the name implies, stores data that has been changed. The Standby Ram is essentially a collection of caches that store data or information for later use. It is simple to remove or delete the Standby data.
Related Articles: