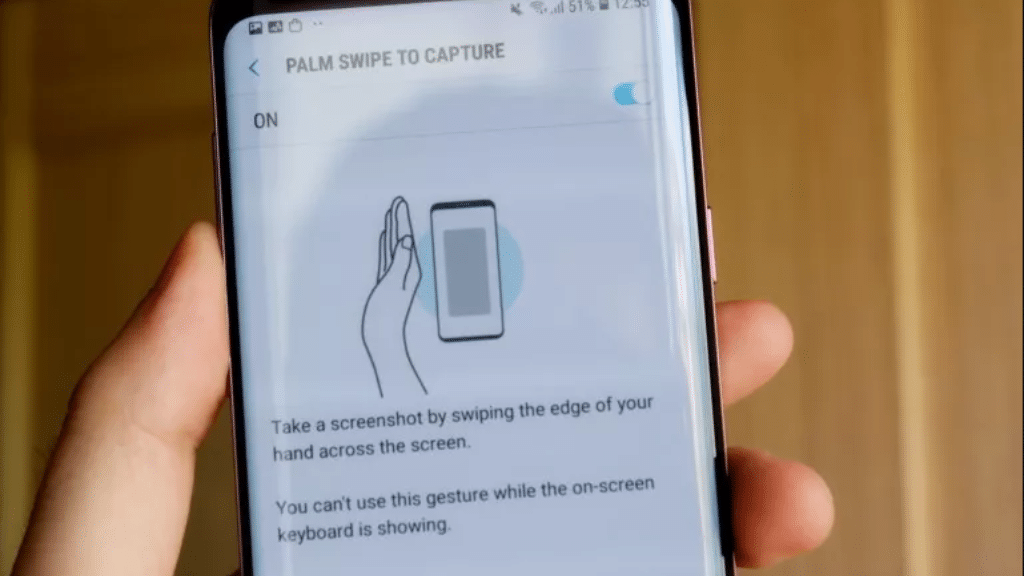
If you use a Samsung smartphone, you may have seen an “Advanced Features” option under the “Settings” page named “Palm swipe to capture.”
A screenshot may be easily taken with this motion by just swiping your palm over the screen.
Samsung phone users, however, have expressed their discontent with this feature because it frequently does not work on their handsets. They swipe their palm across the screen, but nothing occurs.
As a result, if the functionality isn’t functioning for you, you’ve come to the perfect spot to find a solution.
If the Palm Swipe feature on your Samsung smartphone isn’t functioning properly for you, we’ll explain how to fix it in this post.
Solution 1: Verify that Palm Swipe is activated
Make sure your Samsung smartphone has the Palm Swipe to Capture option turned on. Users frequently forget if a feature is turned on and continue to speculate as to why they can’t snap a screenshot or use the interesting function.
To enable the Palm Swipe to Capture function on your Samsung device, follow these two easy steps.
On your Samsung mobile, go to Settings, then choose “Advanced features” by tapping on it.
Now look for the “Palm swipe to capture” option in the Advanced features section and confirm that it is turned on.
How can Samsung devices use Palm Swipe?
To access settings, unlock your device, scroll down the notifications panel, and then press the gear symbol.
Go to the Advanced Features section of the system settings, then choose Motions and Gestures.
Toggle it on by going to Palm Swipe to Capture and tapping on the toggle. Return to the home page.
Simply sweep your hand over the screen after you’ve located the one you want to photograph. When swiping, make sure your fingers are extended and that the edge of your hand is resting on the screen.
As this functionality may not function if the keyboard is displayed on the screen, be sure that it is not in use.
Alternative 2: The Hand Edge Must Touch the Screen
The majority of people mistakenly believe that taking a picture only requires swiping their Palm in the air. The main issue is that individuals don’t know how to use this function properly, which leads to their eventual encounter with this issue.
Many people just swipe their Palm in the air, while others slide their palm over the selfie camera, but they never really contact the screen in any case.
Therefore, you need to touch the phone’s screen in order for the Palm Swipe to Capture functionality to function. When using your palm to swipe the phone, be careful.
3. Remove the Cache Partition.
Shut off your phone.
Press and hold the power button while also holding down the Volume Up button to enter recovery mode.
In recovery mode, choose “Wipe cache partition” by hitting the power button after using the Volume Down button to cycle through the menus.
When the Cache Partition has been successfully erased, choose Reboot System from the menu.
Restart the device in Safe Mode and then in Normal Mode as a fourth option.
To turn the device off, press and hold the Power button until the Power Off option shows up on the screen. Disconnect the power.
Press and hold the Power and Volume Down buttons simultaneously to turn the device on.
The Power and Volume Down buttons are often located on the right and left sides of Samsung smartphones, respectively.
Release the Power button after the Samsung logo shows on the screen to start the device. Hold onto the Volume Down button firmly.
Now, close to the bottom left corner of the screen, Safe Mode ought to be displayed.
In Safe Mode, you may check for a number of problems and explore the device to determine if there are any further problems. For as long as you like, you may utilize Safe Mode to keep an eye on your battery life or mobile data consumption;
When you want to start the device normally after leaving Safe Mode:
In order to exit Safe Mode using any of the following three techniques, the device must be restarted:
Hold the Volume Down and Power buttons down for at least five seconds to try to restart the device.
Holding down the Power button on the right side will restart the device.
By sliding down from the top of the screen, you may reach the notifications panel. To restart the device, choose the Safe Mode icon and tap Turn Off.
5 Additional Techniques for Screenshots on Samsung Devices
1. Employ the shortcut button (Home button)
Not everyone concurs with gesture controls’ advantages. Thankfully, certain Android phones provide a more tactile way to take screenshots.
Before pressing and holding the Home button, slightly press and hold the Power button. It may be challenging to master this skill.
Hold both buttons down for a brief period of time until a visible or audible notification appears.
2. Employ the shortcut button (no Home button)
It is slightly different if you have a Galaxy S21, S20, or Note20 without a physical Home button:
Pressing and holding the Power and Volume Down keys at the same time will cause the screen to flash and cause a click to be heard.
Open the Gallery or Photos app on your phone to find the screenshot. After selecting the Albums option at the bottom of the Samsung Gallery app, look under the Screenshots folder.
Utilize the S Pen.
The Galaxy Note20 Ultra and other Samsung phones with a S Pen are compatible with this technique.
Press the menu icon for Air Command after taking out your S Pen stylus.
Tap Screen Write to capture a screenshot.
As needed, edit the screenshot. Among other options, you may make comments, change the pen’s color and size, delete or reverse strokes, and crop the image.
When completed, tap Share or Save at the bottom.
Four. Employ scroll capture
These guidelines apply to web pages that are wider than your browser window.
Press the Power and Volume Down buttons at the same time.
Tap the Downward arrow icon in the Smart Capture menu (Scroll Capture).
The symbol will move up and down in an oscillating motion. Tap the Icon to start taking a screenshot.
Tap the symbol repeatedly until you reach the bottom or have gotten all the data you need.
Add tags if necessary, then click Save.
To save the screenshot, tap outside the Smart Capture overlay.
5. Make vocal use of yourself
You can take a screenshot using Google Assistant or Bixby Voice by saying “OK, Google, take a screenshot” or “Hey Bixby, take a screenshot.” You may combine instructions as well, for example, “Hey Google, take a screenshot and share on Facebook” or “Hey Bixby, take a screenshot and post on Twitter.”
Why won’t a screen capture function on Android? How to Correct It?
First, be sure you press the right keys.
It is possible that you are only losing your screenshot-taking keys if you are experiencing problems taking screenshots on Android. To snap a screenshot on Android, press the Power and Volume Down buttons at the same time. Always keep in mind that you must press it all at once.
The Power and Volume buttons must be pushed once and then released on the newest Android handsets. You no longer need to hold the phone for a few seconds with the latest Samsung phones that are unlocked.
Reason 2: Google Chrome Doesn’t Allow Screenshots:
Because of a problem in the most recent version of Android, taking screenshots while you’re browsing in Incognito mode is not now possible in Google Chrome.
Reason 3: Your phone’s policy settings
You have a policy set up on your mobile device, which is the third justification.
It’s conceivable that certain functions have been blocked by your organization, school, or institution for a variety of reasons. You will see an error message that reads “can’t due to security regulations” if you attempt to take a screenshot.
You can ask the IT department for clarity in this situation and see if anything can be done. If they permit it, great; if not, you have no other alternatives.
4th Ground: App Policy
Many programs, especially financial and banking ones, disable the screenshot capability for security concerns. A pop-up message stating “Screenshot disable for security reasons” or “Cannot capture a screenshot.” will appear. Personal
Reason #5: The app doesn’t allow screenshots
You might not be able to snap screenshots while using a banking or financial app. You will have to use the built-in feature for sharing screenshots that they have. This is carried out for security reasons. Additionally, it’s a good idea to delete and reinstall any recently downloaded apps.
How to Fix a Broken Android Screenshot?
There are some simple methods for troubleshooting that you may do in the event that you are unable to take a screenshot.
Solution 1: Remove recently installed applications
Finding out which applications you recently installed should be your first step if you were previously able to snap a screenshot but it no longer functions.
See whether you can still capture screenshots without having it installed. You might not have been able to view your device’s whole storage space because you were attempting to capture a screenshot.
Solution 2:Check the device’s storage (it may already be in use if you were unable to capture a screenshot).
You can see messages like “Couldn’t capture a screenshot because there wasn’t enough storage space” or “Couldn’t save the screenshot. Storage might be in use, to use a formalized expression Restarting and checking would be the solution, and if it did not work, emptying storage would be necessary. Low-cost Android Go smartphones with less internal storage frequently have this problem.
Solution 3: The proper keyboard shortcuts for screenshots
With Android 10 and above, you just need to press the Power and Volume Down keys once before the screenshot is taken; you no longer need to hold down both buttons.
Alternative Screenshot Method as a Fourth Option
There are various ways to take a screenshot, including the following:
The default approach on Android uses physical buttons.
Google Assistant screenshots Palm-swiping Technique: A screenshot is made by swiping your hand over the screen.
5th Alternative: Root Your Phone
The most brilliant idea would be to root your phone, which, if it had a screen capture or screen-grab problem in the past, would undoubtedly repair it.
More precisely, becoming a superuser—a role you might be acquainted with from the Linux operating system—is required to get root access on Android. In many respects, you might consider this an example of restoring a feature that was originally supposed to be there.
Users may install and run programs that need specific permissions, get around carrier-installed software, and even get rid of bloatware by rooting their Android smartphones and tablets (as opposed to simply disabling them).
Even apparently unimportant items like some custom fonts need root access to be installed, and rooting Android may also make some apps and launchers more powerful.